Birthday season in The Mom of the Year household is upon us, friends. Our entire family, immediate and extended, without exception, was born between the very end of May and October 1. What does this mean for you? A lot of upcoming scary Facebook pictures of Mommy looking like a psychotic mess and undue excessive whining about the defining destructive power of children’s birthday parties. In advance, I’m sorry.
But listen, this may not actually be that terrible. Trust Alisa to be the sane one in the room–the one that tries to make a logical go of these birthday shennanigans AND have fun with them. Mostly, the fact that she understands you need wine to do these things makes her so human. Here’s to birthday party season, amazing Alisa!
**********************************************************************************
 Cooking and craftiness are in my blood. My mother made our Halloween costumes from scratch almost every year. My grandmother had a degree in home economics and created her own (amazing!) recipes that fed her family of nine for pennies. I love nothing more than to crack open a bottle of wine and get my crafty on. I understand that all this talk about crafting and cooking makes some of you shudder, but as far as I am concerned once you have kids, it is just a practical skill that is worth honing. Even if you don’t have a crafty bone in your body. Even if the word craft makes you want to curl up in the fetal position at Michaels. It won’t hurt to give it a whirl with Alisa as your guide, right? We’ll start with something simple and a necessary evil. The birthday party.
At some point in parenting, hosting a birthday party for your children or a baby shower for your bestie becomes unavoidable. You can hit the Party City and order eleventy pizzas from the local joint or decide that you are going to try to do (some, or all of) it yourself. Breathe into the paper bag. Drink a glass of wine. Repeat.
Still with me?
Let’s talk decorations.
The truth is you never have to set foot in Michaels to do your own Pinterest worthy decorations. In fact you can pick up just about everything you need at the most wonderful place on Earth, my very own happy place, Target. For my son’s third birthday we did an airplane/helicopter theme.
Rule # 1: Keep it simple.
Don’t go full Pinterest. You will end up with so much crap that you spent time or money on, making it hard to toss it when the party is over. But when is your daughter ever going to want another Minnie Mouse themed party again? Probably never.
Rule # 2: Use what you already have.
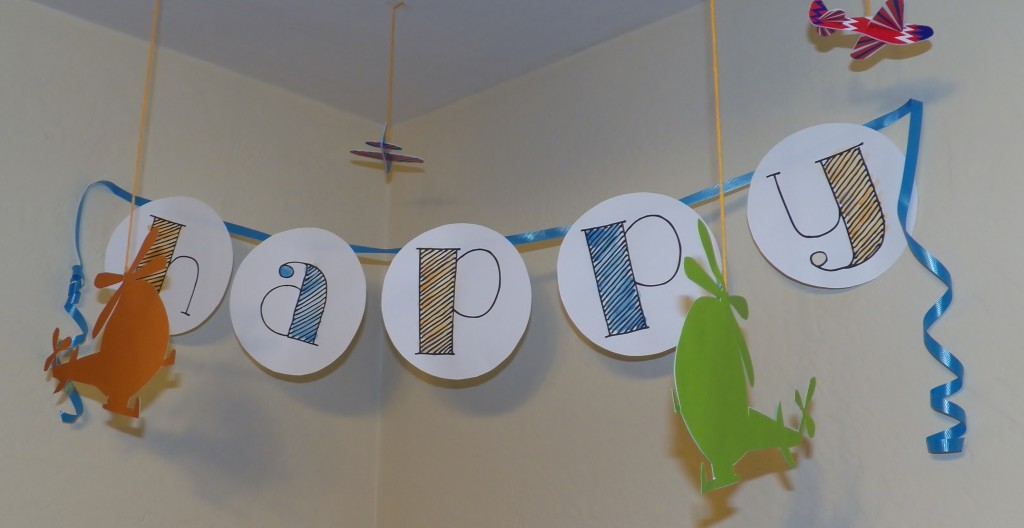
I picked the helicopter/airplane theme because we already had a bunch of those Styrofoam airplanes and two airplane kites. I made some helicopters out of some scrapbook paper I had and hung it all from the ceiling. This saved me money on décor and saved me time because I wasn’t crying in the corner at Michaels.
Rule # 3: Skip the party favors.
Most party favors are plastic junk that parents have to secretly smuggle from their children and toss like bad preschool art. If you must offer your guests something to take home, make it an activity. Provide buckets of bubbles, chalk, play dough, or set up your art easel with crayons and paint. Parents can take these items home or opt to leave them behind, lest they end up with their little one’s play dough sculpture ground into their minivan’s carpet.
Rule # 4: Go big on items you can use again.
Last year, I made this lovely sign that said “Big man is two!” Too bad he’ll only be two once. This year, I made a big “Happy Birthday” banner that I can use again! For both kids! And maybe even myself! (I do love a good party.)
Alright ladies (and maybe some gents?) This is the part where we break out the wine (or moonshine, or beer, whatever floats your boat, people) and get crafty.
Supplies:
• Scissors
• Computer
• Printer
• Cardstock 8.5×11, standard printer paper size (I used white, but you can pick a color you like and save yourself a step! Also, you can find cardstock in the office supply section at Target.)
• Ribbon (I used gift wrapping ribbon, also available at Target.)
• Tape
• A salad plate or bowl that you can trace to make a perfect circle (Confession: as crafty as I am, I CANNOT draw or cut a circle to save my life. It always looks like a lumpy egg. So I cheat. And those of you who think you can’t craft, you can cheat too!!)
• Watercolors, markers or crayons. Whatever you have on hand will work. If you opted for color paper, you can skip this!
Step 1: Happy Birthday!
Open up a Word document and type out your banner phrase. (I’ve been seriously contemplating making one for all the ridiculous things I have to say everyday like “Stop splashing in the toilet” and “Don’t eat your shoes” but my kids can’t read yet.) Make the font big enough so there is one letter per page and center it. I used this fancy font I downloaded for free. (Chalkboard fonts are ALL the rage right now.) You can download the font here.

Step 2: Print & Cut.
Use your plate or bowl to draw a circle around each letter before you cut them out. Unless you are a Jedi Master Circle Cutter, then just freehand it.
Step 3: Beautify.
I used watercolors to paint the inside of my letters. You can use a marker or crayons as well, but choose a light color. If you used color paper you can skip this step.

You can clearly see I painted outside the lines. No one cares. It’s art!
Step 4: Assemble.
Use tape to attach each letter to the ribbon. Leave a little extra ribbon on either end to make it easy to hang. Voila! A Pinterest worthy party banner in four steps or less!


*************************************************************************
Want more of Alisa’s smart fabulousness? Check her out on Twitter!
Latest posts by Meredith (see all)
- The Dollhouse Academy Book Club Discussion - February 14, 2025
- Somewhere Beyond the Sea Book Club Discussion - January 10, 2025
- Here One Moment Book Club Discussion - November 8, 2024


Alexis says
I’m in the midst of planning a Minion party (note: even Pinterest is void of cool minion party games, so far all we’ve got is “hide the banana” which sounds really dirty but honestly is exactly what it says). It’s 2 weeks away and I’m already exhausted! I was going to buy some minion printables on Etsy but I think I’ll keep the $5 and try this again. Great tip!
Alisa says
I actually put up the decorations for my son’s party almost a week in advance. All your prep will pay off and allow you to enjoy the day! Personally, I prefer activities over games. Kids can bumble from one activity to another vs. games which require an adult (me) to facilitate. Maybe you can set up a table to decorate bananas like minions? You can totally draw on the peel!
Cynthia Gabriele Sprouts Consignment Boutique says
Fantastic advice & ideas!
Alisa says
Thanks! I love a good party. 🙂
Chris Carter says
That is SO COOL!!! Oh, if I could only have the energy and well, desire (to be honest here) to do something so awesome!!! I *may* try it for my daughter’s upcoming birthday…
Breathing in a paper bag. Now.
Alisa says
You can do it Chris! You don’t have to do everything from scratch. Pick one piece of decor you want to do. Next time, pick two. 🙂
Jackie says
When I was growing up, we didn’t do birthday parties. I can only remember my 4th and it was a lopsided two layer yellow cake with chocolate icing that my mom made. No one was there but my 2 brothers and my mom and those 4 sad candles on the cake. I don’t remember balloons or anything. I turned out all right. I have no intention on going into debt behind birthday parties. I do however choose to focus on creating memories with my 2 (ages 3 and 4) because that what really matters anyway right?
Your ideas are practical and awesome!! Thanks for the reminder that it doesn’t have to take a lot of money, just a lot of imagination.
Alisa says
We did most of our birthday parties at home with just family and a homemade cake. There’s nothing wrong with keeping it simple!
Concept Kids Party Supplies says
While organizing the birthday party it is our responsibility to keep the party simple. Also I welcome your thoughts on birthday party.
Meredith says
Simplicity for the win for sure!